Friday, 30 December 2011

I made : Easy Linen Shirt (it's pink!!)

So as part of my commitment to sew something for each day that I'm on leave, I give you the Easy Linen Shirt from the Sewing for Boys book that I bought earlier this month.

Tadaaa!! Pink Linen Shirt
The pattern itself was simple to trace and simple to put together. I kinda struggled at the sleeve attachment and also the collar. But I still think it turned out great. My son couldn't wait to put it on just as soon as I finished sewing it.

happy

happier

happiest

My only beef was that the neck opening is a bit low for my son..but that can wait until the next time he needs a new shirt. I'm gonna try out the Sweetheart Pj's using a camouflage print. Gonna have my finger's crossed that it'll turn out okay.
read more "I made : Easy Linen Shirt (it's pink!!)"

Thursday, 29 December 2011

I made : Shoulder bag (also a review of Sew! by Cath Kidston)

I may be the last person in the world to have bought Sew! by Cath Kidston. What got me hooked was that the book offered free (yes...I'm a sucker for free things..it's a Malaysian trait) cotton duck fabric to make the bag on the cover.

So I bought it and brought it home and started to read through the book. Sadly I find it lacking in terms of visual aids. To make the bag, I had to really really really read the instructions line by line. Probably this book is not catered to beginners like me. Other than that, all the other projects look pretty simple to make..I'm looking forward to make the beanie cushion & the bolster cushion...well that is if I don't procrastinate.

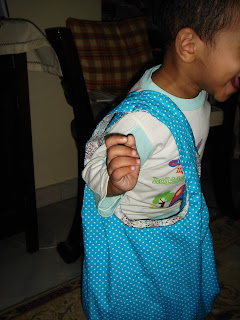
Anyhow, here's my finished shoulder bag using the free (hehehe..here comes that magic word again) fabric that came with the book. Enjoice!


read more "I made : Shoulder bag (also a review of Sew! by Cath Kidston)"

Wednesday, 28 December 2011

Recipe : Fried Rice with Mushroom Omelette

This is what I cooked for today's breakfast : Fried rice with mushroom omelette. Enjoice!

Ingredients :


For Fried Rice
2 cups cooked rice
1/4 sliced yellow onion
A handful of prawns
A pinch of salt
1 teaspoon of chilli paste
Vege..loads of veges
1 slab Fishcake - thinly sliced

For Mushroom Omelette
3 eggs
1/4 diced yellow onion
4 button mushrooms - diced
A pinch of salt
1 slice of cheddar cheese - diced
1 tablespoon of mayonnaise

How To :

For Fried Rice
In a pot, add a pinch of salt to the cooked rice & distribute evenly. In a wok (or a pan), sautee onion until soft and then add the chilli paste. After that add the prawns, veges & fishcake. Once everything is tender, add the rice. Stir the rice until everything is cooked/dry-ish. Serve hot with omelette.

For Mushroom Omelette
Crack eggs in a bowl & add the mayonnaise. Beat until slightly fluffy. Add salt, cheese, mushroom & onions. Fry the omelette & serve hot with fried rice.

Prep & Cooking time : 20 30 mins
read more "Recipe : Fried Rice with Mushroom Omelette"

I made : A new reversible bag!! (Birthday gift for my mom)

My mom's birthday is on Christmas' Eve so.....every year my sister & I would scratch our heads and go crazy over deciding what to get her.

Since going shopping is out of the question as I want to avoid the mad x-mas shoppers, I turned to the net & found this gem! It's a reversible tote pattern & tutorial by VeryPurplePerson. Thanks a lot to Novita for making this free.

So, I made it using blue polka dots on one side & the other is a funky floral print. Hope my mom would love this bag as much as I loved making it. Enjoice!


read more "I made : A new reversible bag!! (Birthday gift for my mom)"

Tuesday, 27 December 2011

Breakfast Mania : A list for the whole week

Since I am on my week long break & also a request from my husband, I will be sharing a list of what I plan to make for breakfast for this whole week. Here goes :

Tuesday (27/12) - Egg sandwich Hot Milo
Wednesday (28/12) - Bread with Beef & Potato curry  Kaya & Butter + Hot Milo (again)
Thursday (29/12) - Fried rice with mushroom omelette
Friday (30/12) - French toast
Saturday (31/12) - Anchovies fritters
Sunday (1/1) - Fried meehoon with prawns
Monday (2/1) - Nasi Lemak with dried prawn sambal

All items are subject to availability (and also depend on how early I wake up). Wish me luck!
read more "Breakfast Mania : A list for the whole week"

I made : Basic Kid Pants

Since I am on a week long holiday, I decided to do one project each day. Turns out I'm such a procrastinator hehehe...however I am saved by this free tutorial and pattern for a pair of basic kid pants from Dana Made It.
The post was made in 2008 but it is still going strong! Thanks Dana!!

my son being the ever wonderful model
I made the pants using my husband's khakis that he can no longer wear since the seams were already worn down. Right now I am planning to make this version in denim & enlarging it around the waist & bottom area since my son is using cloth diapers. It's a snug fit currently but he seems to be enjoying himself. More pics for you to enjoy.


Cute little pot belly!

Mom stop taking my pics! I wanna plaaayyy
read more "I made : Basic Kid Pants"

Sunday, 18 December 2011

Recipe : Simple Spaghetti Carbonara (using mushroom soup)

* Sorry there are no pictures..me & hubby were too hungry =)


I would like to share my version of Spaghetti Carbonara using a can of Campbell's mushroom soup. My husband and son loves this, so I hope that you would too. So, enjoice!


Ingredients :

2 tablespoon butter
1 medium yellow onion, sliced
3 cloves garlic, chopped
1/2 can of mushroom soup
1/4 cup of milk
1/4 cup of water
1/2 packet of spaghetti
Salt & pepper to taste
Oil
Prawns
Button Mushroom or whatever that you have available
(Feeds 2 hungry adults)

How to :

For spaghetti
In a pot, add water, a drop of oil & 3 pinch of salt. Bring to boil. Add spaghetti. Cooking time as the instruction on the packet.Once done, drain the water & add a few drops of oil to the spaghetti to prevent it from sticking.

For sauce
While water is boiling, add butter + a bit of oil to pan & sautee the onion till soft.
Then add garlic, pepper & prawns. (You can substitute with minced meat/chicken if you like)
Once garlic is soft, add the mushroom soup, milk & water to the pan. Let the sauce thicken.You can add the additional mushroom during this time if  you like.
Add salt as desired.
Serve hot!

Prep time : 5-10 mins
Cooking time : 15 mins
read more "Recipe : Simple Spaghetti Carbonara (using mushroom soup)"

Saturday, 17 December 2011

Book Review : Sewing for Boys: 24 Projects to Create a Handmade Wardrobe

Okay..I'm no expert seamstress but I am sooooooo excited that I bought this book!

Wooohoooo!

I bought it at Times Bookstore in Bangsar Shopping Centre. It costs RM88. To me it's worth it since you'll get 8 pattern sheets, it is hardcover & spiral bound, full of lovely pics for inspiration & well written instructions.

The price is well worth it
Not only does it help you to create a wardrobe for your little man but it also includes a section on crafts as well. There's also a web companion for Sewing for Boys where you can check out end projects from other sewist & sew-alongs.

For me, I can't wait to start on the sweetheart pj's and also the easy linen shirt. Does pink linen go well with a 2 year old boy? Hehe..I can't wait to find out...
read more "Book Review : Sewing for Boys: 24 Projects to Create a Handmade Wardrobe"

Thursday, 15 December 2011

DIY : Pillowcase (A Tutorial)

Since I can't keep my hands off my new machines, I decided to make a simple tutorial on how to make simple pillowcases. It's done in the envelope style and using standard (well...standard in my house) sizes.

All right, first off you would need around 2 meters of fabric to make 2 pillowcases. I use the 45" (standard) width fabric. Bought it in Kamdar for Rm2/meter. You can use fancier fabric if you like but to me these are just fine.

The dimension for the pillowcases
The dimension is like the picture above. You will have to cut 3 pieces for 1 pillowcase.

  • A - 29.5 " x 19.5"
  • B - 26" x 19.5"
  • C - 8" x 19.5"
Once you've cut it..it'll look like this :-
From the top (clockwise) - A, my son's feet, C and B
Serge the sides and then for pieces B & C, sew one side (the one with the 19.5" length) at 1/4" seam allowance. It should look like this :


After that, lay out the pieces accordingly. (I used different color pieces to show the layout clearly..I didn't make my pillow in 3 colors in case you're wondering)
Layout piece B on top of piece A up to the left most edge

Layout piece C on top of pieces A & B..to the right most edge
Pin all the edges..taking care on the overlap of pieces B & C.
I folded back piece C to pin B to A

Then, pin back C to B
Now you can start sewing with a 1/2" seam allowance. (Well, I just prefer to have a 1/2" allowance, you can have yours to be 1/4" if you like). Do take special precaution when sewing over meeting point for B & C. I reverse a couple stitches so that it's stronger.
See the place where it's pinned? Yeah..I reverse stitched there a few times

And then when you're done sewing the whole rectangle, just flip it inside out and you're done!

Tada!
So, do try it out and let me know if there's anything confusing. Happy Weekend everyone...Enjoice!
read more "DIY : Pillowcase (A Tutorial)"

Sunday, 11 December 2011

New Sewing Machines!!!!!~~~!!!

Yeayyyyyyy...Finally got my new sewing machines...both are from Singer. Probably now I should change the name of this blog to MesinJahitBaru ( Translation : New sewing machine) instead of MesinJahitLama (Translation : Old Sewing Machine).

My old sewing partner is the Singer treadle model 15-K.

See..peeled logo..it's really old
Actually I really like using this treadle. It's very simple & straightforward...does magnificent stitches..doesn't complain when I use it long enough..you just have to oil it after use and make sure that it's relatively clean.
I would certainly recommend everybody to get their hands on one of these babies.

ANywayssss, my new toys are pictured below. I can't seem to keep my hands off them both. I got one serger and one portable sewing machine that could stitch other than a straight line (Sorry 15-K!). Enjoice!

My new Serger (4 thread model..yum!!)
Confidence! Now I am more confident to sew =)
read more "New Sewing Machines!!!!!~~~!!!"

Monday, 5 December 2011

Fabric Madness Friday

GorRRRrrrr!11!!!!!!...Friday was such an unproductive day. Considering it was wet, splashy and cloudy my coll. & I decided to go for retail therapy. Where else do working women go on Fridays when the men are off for their weekly prayers? Jalan TAR la mana lagi.

So I splurged on kain batik sarung and also some polka-dot madness viscose cotton. Maybe I'm going to turn the batik into skirt & dresses for girls (even myself...haha). And for the oh so cute cotton, probably I'm going to turn one into baju kurung and the rest into something like Simplicity 2023 or 1972. Will be posting the end projects once I get my new machines =)

Enjoy the pics of my splurge!

I like the old skoolness of the 2 right pairs

Yummy Polka-dots!!

read more "Fabric Madness Friday"

Saturday, 26 November 2011

Upcycle : XXL Shirt to Blouse

Another upcycle project for this weekend. I turned my husband's shirt into a blouse.

What I did was I took in the sides, took off the collar and made a v-neck. Also, I cut the shirt along my waistline, gathered it and added the rosettes. For the sleeves, I unpicked the seams to add in elastic so that it became slightly puffy.

Hope that this will give some inspiration to others to upcycle. It's fun & highly addictive!

read more "Upcycle : XXL Shirt to Blouse"

Friday, 4 November 2011

Upcycle : From Batik Sarung to Cute Skirt

For this long weekend, I upcycled my batik sarung into a cute skirt. Enjoice..
I do have legs, I just chose to edit it out from the pics =)

read more "Upcycle : From Batik Sarung to Cute Skirt"

Wednesday, 26 October 2011

DIY : Cushions

For my first post, I am going to make new cushions since my existing ones are begging for their lives. 


(this is what they look like without their covers)
Thus, the new cushions are made from remnant fabric that I had from making pillowcases. The fabric that I have is just plain cotton fabric, RM2 per meter that I bought in Kamdar. 


The simple steps for making cushions are :


1) Measure the fabric to be a 16" x 16" square. You'll need 2 pieces of these. You can adjust the size as needed since all my covers are this size.


2) Cut the square that you have just measured. Make sure that the right sides are facing together  , so that you will be sewing on the wrong sides.


3) Sew along the red line around the 4 edges and leave a gap just enough for your hand to go through to fill your new cushions with whatever filling that you have.


4) Snip along the blue line to have nice pointy corners.


5) Turn your cushions inside-out & start filling.


6) Once you have achieved desired fluffiness, hand-stitch the small gap closed.


(In this pic, the small gap hasn't been closed yet..)
There you go, new cushions for you to admire. Happy Deepavali to all & enjoy your public holiday.
read more "DIY : Cushions"
Related Posts Plugin for WordPress, Blogger...